Nurses in the ICU often need to administer life-saving therapies such as blood products. When patients are in need of blood products, the goal is to deliver therapy in a safe and timely manner. It is the nurse's responsibility to pay attention to detail and focus on accurate patient identification and verification of transfusion orders to avoid potentially fatal errors.
Informed Consent
The physician is responsible for communicating the elements of informed consent to the patient
The nurse may present a consent form to the patient
Either the provider or nurse can witness the patient's signature
Documentation of patient informed consent must be present in the patient's medical record before administration of blood and/or blood products.
There are 2 different forms:
The MC3999-23 is for non-emergent, non-surgical procedure situations. It is effective for the duration of the admission and is valid for up to 1 year of the current admission. However, if the patient is discharged and readmitted, a new consent must be obtained.
MC3999 is for surgical/procedure areas. It is effective for the duration of the procedure and post-procedural period only.
Pre-transfusion Documentation
When the provider places the blood order, he/she includes transfusion indication, any special requirements if needed, and confirms that he/she has received informed consent. When the provider signs the order, the nurse should confirm that both the prepare and transfuse orders are listed. The prepare order is the order for blood bank to prepare the blood product and the transfuse order is the order for blood administration to the patient.
First, make sure that the patient has a working 18 or 20 gauge IV for administration of blood products.
In Epic, find the "Blood" flowsheet and click the "transfusion release report" button in the upper left corner.

Look in the "consent section" to ensure that a recent and appropriate consent form has been obtained & review any blood bank results as needed.

Ensure there are 2 orders: 1) prepare and 2) transfuse. If you do not have both, contact the provider before obtaining the blood as you are not authorized to obtain and transfuse the blood without both. Obtaining blood without a transfusion order is troubling because blood administered should be started within 30 minutes of obtaining from blood bank and completely transfused within 2-3 hours. Transfusion beyond 4 hours increases risk of bacterial contamination.

Next to the transfusion order, click on "release". This tells the blood bank that the patient is ready for the product to be picked-up. Clicking it will print a blood release form needed when going to blood bank for pick-up.
Note: If the orders indicate that more than one unit will be transfused, only release one unit at a time unless it is an emergent situation.
Blood Product Retrieval and Handoff at Blood Bank
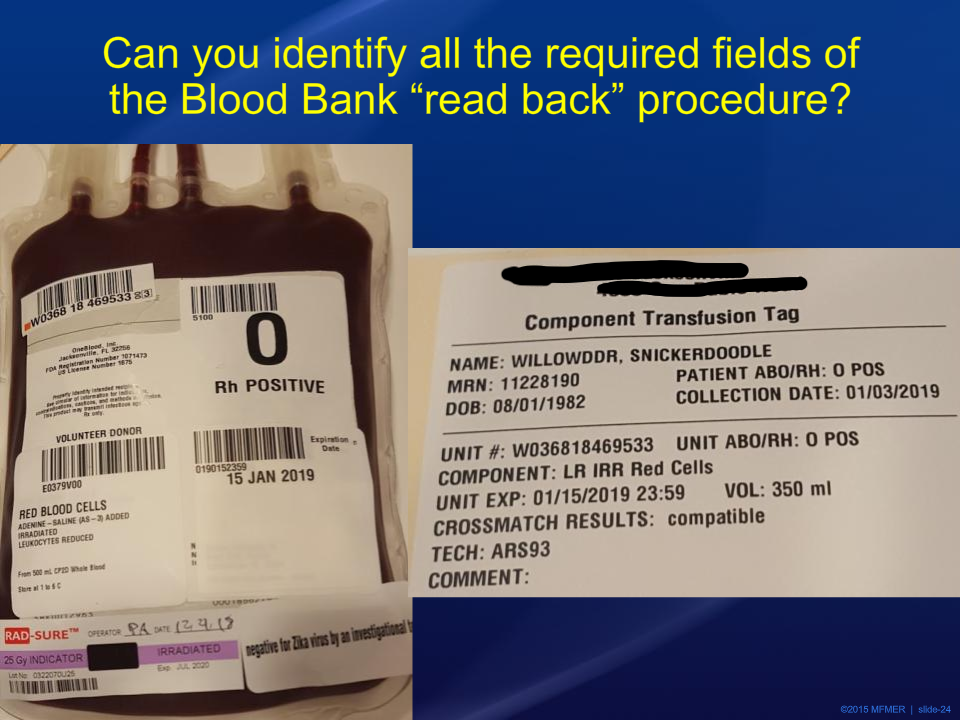
Proper handoff at blood bank includes a 2-person check-off of the following:
Patients name (first and last)
Patient MRN
Patient ABO and Rh type
Donor unit ABO and Rh type
Unit number on crossmatch sticker
Unit number on product bag
Blood product type
Blood product expiration date
Crossmatch test results (only RBC)
Starting a Blood Transfusion
At the bedside, confirm the following with the patient's armband:
Verify patients full name and DOB at bedside
Verify MRN
Verify that the tag and the bag match checking unit ABO, patient ABO, unit number, and expiration date
Verify crossmatch compatibility
At the computer, click on the "Begin Blood Transfusion" button:
Select the site of transfusion administration
In the blood product administration module (BPAM), scan the patient's armband
Next, scan 1) donor unit number, 2) product code, 3) blood type, and 4) expiration date
Document starting rate (100 mL/hr)
Document patient vital signs
Make sure to charge for the unit administration by clicking the "Units administered" button under "$ Blood Admin Charge". This documentation will file one charge per day and nurses click this button every time regardless.
Document that you checked the ABO by clicking "completed" under "Blood Admin Documentation".
Click "Accept" to start administration
Preparing the blood product and IV line:
First , prime one line with 0.9% normal saline to purge air.
Next, prime the second line with blood product all the way to the vascular access point (#8 in the image below).

The 15 Minute Check After Transfusion Begins
The RN must stay with the patient for the first 15 minutes of transfusion during which signs and symptoms of acute hemolytic reaction usually present. At the 15-minute mark, complete the following:
Assess the patient and how they are feeling. Ask about dizziness, back pain, and itching
Check vitals: BP, HR, SpO2, Temp
Document in a new column of the vitals flow sheet under the "Blood" tab
If the patient is tolerating the transfusion well, you may want to increase the rate of transfusion to complete within 2-3 hours. Increase rate per hospital guidelines.
Click in the row "Red Blood Cells Action" to document a "rate change".

Click in the row "Red Blood Cells Rate". The BPAM will open. Verify that the "action" in BPAM says "rate change". Enter the new rate and accept.

Stopping and Completing a Blood Transfusion
Stop the pump
Assess for symptoms
Assess vital signs and document
Open the "Blood" flowsheet
Add a new column in the flowsheet and enter 0 for rate change and press enter.
The volume calculator window will open. If the total volume is correct and the transfusion is complete, press "accept and complete" to complete the transfusion.
Note: If the patient has a reaction to during transfusion and the blood is stopped, press "accept". Pressing accept will document a stop but not a completed transfusion.
Once the transfusion is completed in the chart, the rows disappear in the flowsheet. To view, uncheck the box at the top next to "Hide Completed". The rows will reappear and be highlighted in grey. To reactivate the product, right click on the product header row and reactivate.
Note: Completion of blood products is very important and should not be forgotten. It allows for future product releases and accurate intake/output documentation.
Documenting a Suspected Transfusion reaction
Febrile non-hemolytic transfusion reactions with erythrocytes are more likely to occur in patients who have received multiple transfusions. Administration of leukocyte-reduced blood can reduce but not eliminate risk. Fever usually appears during or up to 6 hours after the transfusion and is more common with platelet transfusions (30%) compared to erythrocyte transfusions (0.5%).
S/S of Febrile Non-hemolytic Reactions: Defined as an elevation in temperature of >1 degree Celsius during or up to 6 hours after transfusion unexplained by another cause. Fever typically does not appear in the first hour unlike acute hemolytic reactions discussed below.
S/S of Acute Hemolytic Reaction: symptoms are abrupt and within minutes of starting the transfusion. In addition to the symptoms listed below, severe reactions are accompanied by coagulopathy and progressive multiorgan dysfunction.
hypotension
fever (>1 degree celsius change)
rigors/shaking/chills
Pain: chest, low back, arm
facial edema
hives/rash/itching
nausea/vomiting
dyspnea
pulmonary crackles/rales/wheezing
red or dark urine
Treatment:
Stop the transfusion immediately as severity is a function of volume
Obtain a BP reading
Verify the correct blood was given to the correct patient. Hemolytic reaction is unlikely if the donor blood is correctly matched.
Notify blood bank
Collect blood samples for 1) plasma-free hemoglobin test determination to look for evidence of intravascular hemolysis and 2) direct Coomb's test for evidence of the anti-ABO antibody.
If an acute hemolytic reaction is confirmed, management will be similar to septic shock: blood pressure support, ventilation support, volume resuscitation, vasopressors if necessary.
If the patient develops anaphylaxis, they may develop urticaria, subcutaneous angioedema, airway angioedema, bronchospasm/wheezing, hypotension, diarrhea, chest pain and pruritis without rash. This is treated with prescribed epinephrine, glucagon, antihistamines, bronchodilators, and corticosteroids.
If the patient develops mild urticaria without fever, a hypersensitivity reaction is suspected. Stop the transfusion and give antihistamines 25-50 mg IV/PO/IM as ordered. Washed RBCs should be used for future transfusions for this patient.
If acute hemolytic reaction is not confirmed and fever develops within 6 hours of transfusion, treat fever with antipyretics as prescribed. Blood bank may perform a Gram stain on the donor blood to check for microbial contamination, which is rare in stored blood. If found, the most frequent isolation from blood cultures of stored RBCs is Yersinia enterocolitica.
Comments